Age Verification
This website contains age-restricted material including nudity and explicit content. By entering, you confirm being at least 18 years old or the age of majority in the jurisdiction you are accessing the website from.
Our parental controls page explains how you can easily block access to this site.
0
Discussions for Scenes for Version 1.2.X Fullscreen Mode here Forum / Everything about iStripper
x26638184
Joined in Oct 2018 189 post(s)
August 26, 2020
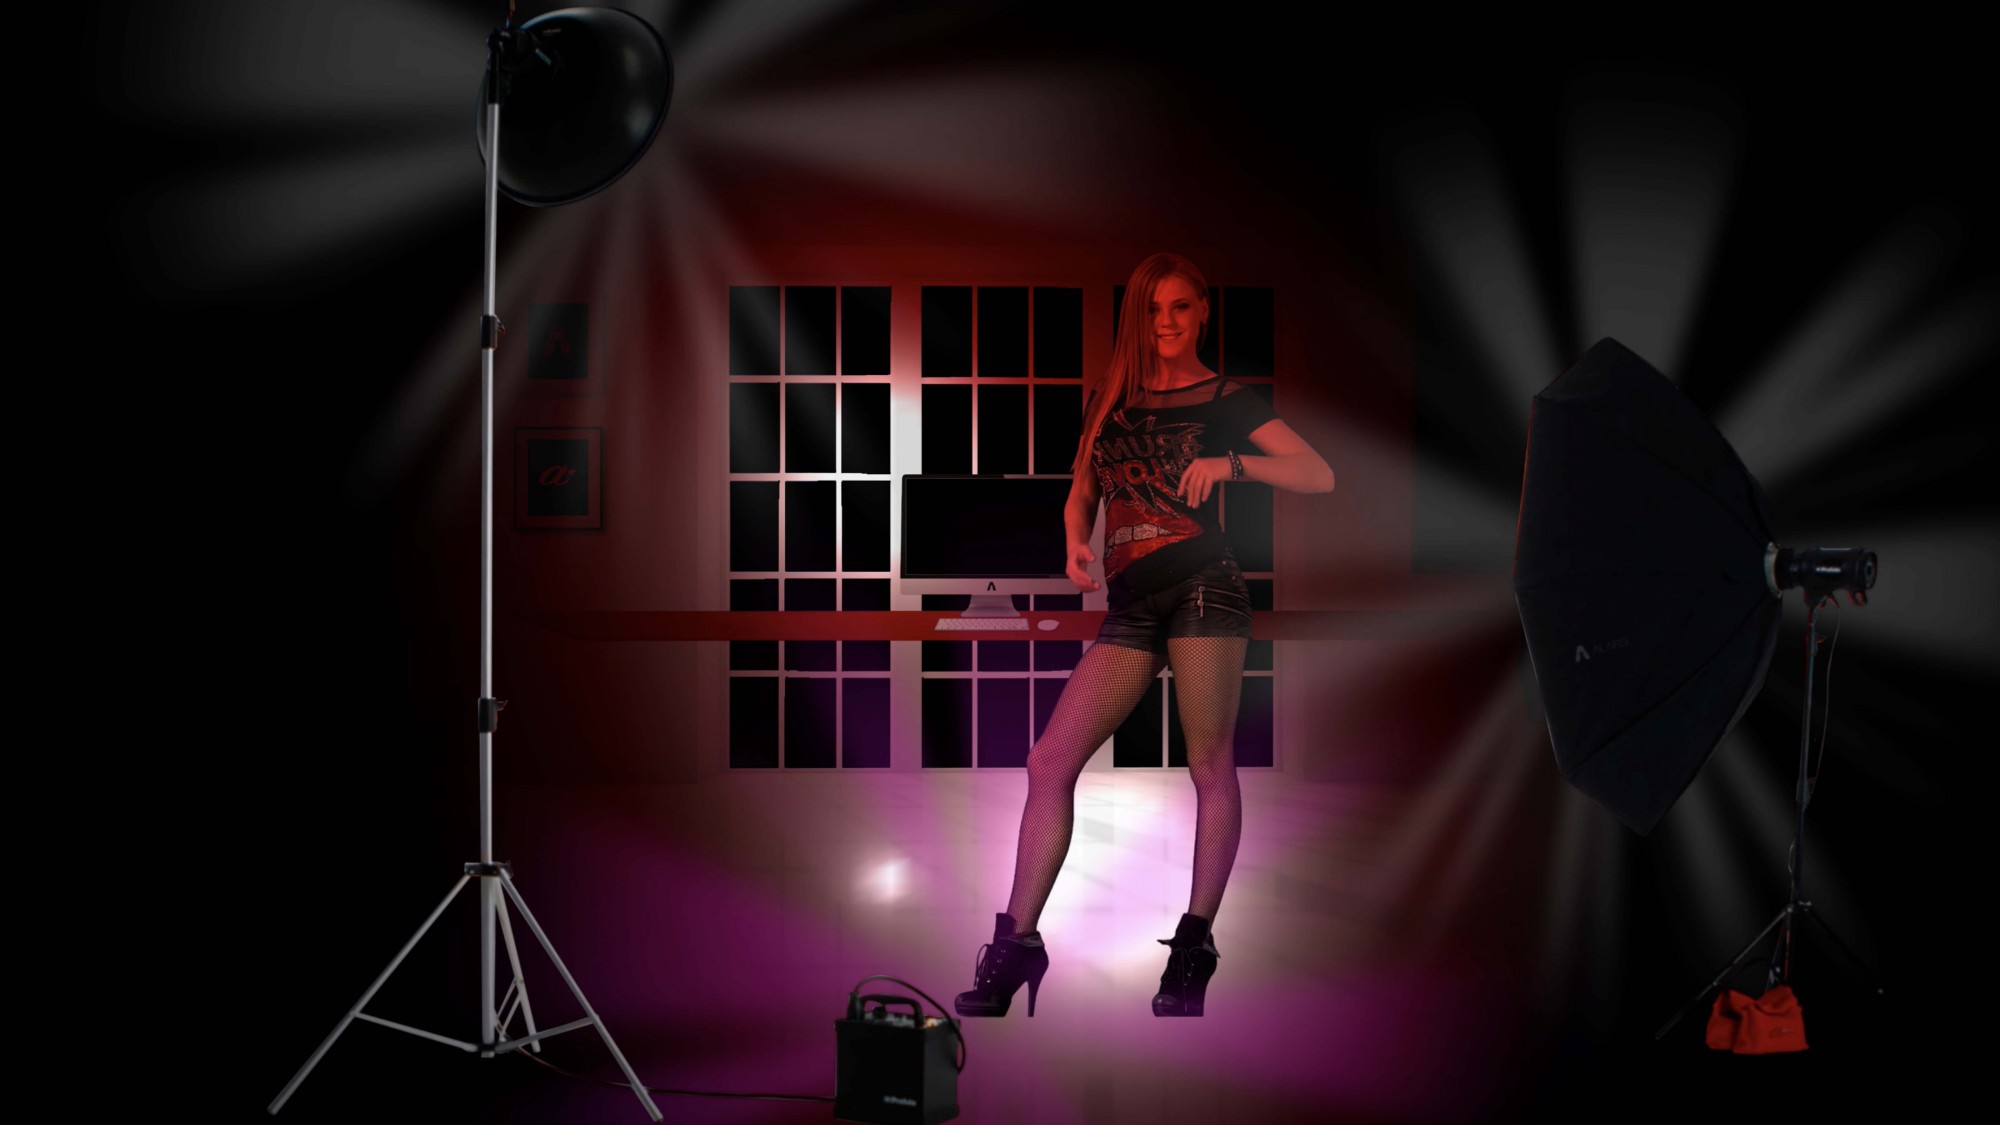
@Wyldanimal: your scene lighting code is amazing !!! (+WA - Lights2 = 1080p Camera2.scn)
I'm doing a hybrid scene and it looks spectacular. It is a very good wine for my eyes.
I want to leave your lighting code 100% pure and merge it with this special scene.
Once I finish it, can I publish it with your corresponding acknowledgments?
Is it possible that the lighting resolution is 4K?
I'm doing a hybrid scene and it looks spectacular. It is a very good wine for my eyes.
I want to leave your lighting code 100% pure and merge it with this special scene.
Once I finish it, can I publish it with your corresponding acknowledgments?
Is it possible that the lighting resolution is 4K?
Stanston
Joined in Aug 2018 1013 post(s)
August 26, 2020
@JayZ971
I uploaded the Content from one of my Scenefiles, check it out😉
https://paste.ubuntu.com/p/XQBdyxMx8G/
I uploaded the Content from one of my Scenefiles, check it out
https://paste.ubuntu.com/p/XQBdyxMx8G/
August 26, 2020 (edited)
@JayZ971 - You needed to put the clipNameSprite in a gap between scene elements, not nested inside a clipSprite. I would suggest putting it immediately after the closing "}" character of the clipSprite.
@JayZ971
I uploaded the Content from one of my Scenefiles, check it out😉
https://paste.ubuntu.com/p/XQBdyxMx8G/
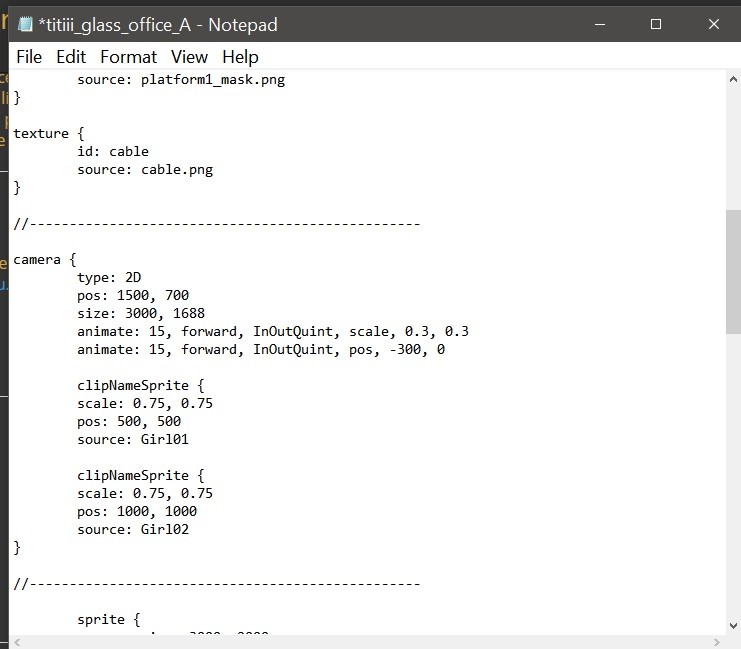
Thanks @TheEmu @Stanston
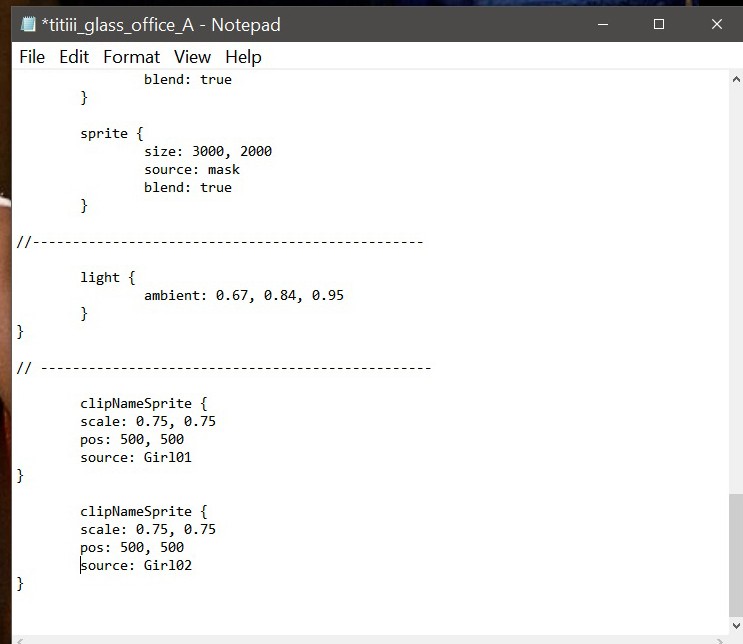
The scene that I am trying to put the name sprite on has 2 girls. I moved the clipNameSprite to the bottom of the .scn file & got it to work for one of the girls. So I guess that I need to do another clipNameSprite for the other girl.....
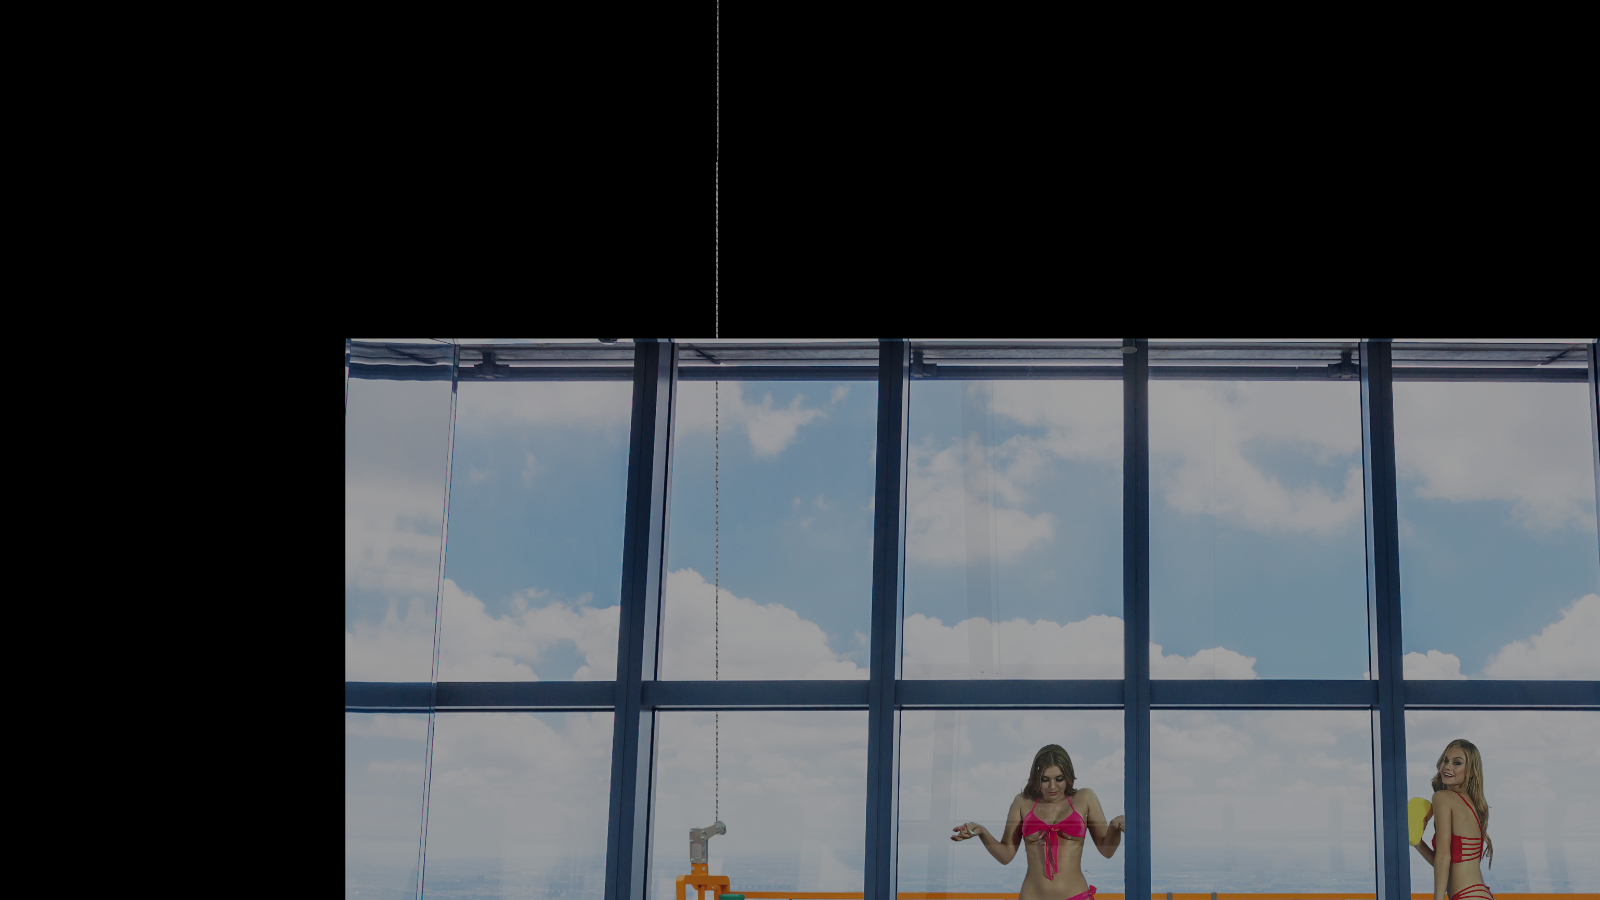
I did add the other clipNameSprite......now neither name works.....suggestions ? (screenshot)
Stanston
Joined in Aug 2018 1013 post(s)
August 26, 2020
Change the
pos: 500, 500Value for Girl02. At the moment both Names are laying on top of each other :)
TheEmu
Joined in Jul 2012 3309 post(s)
August 26, 2020
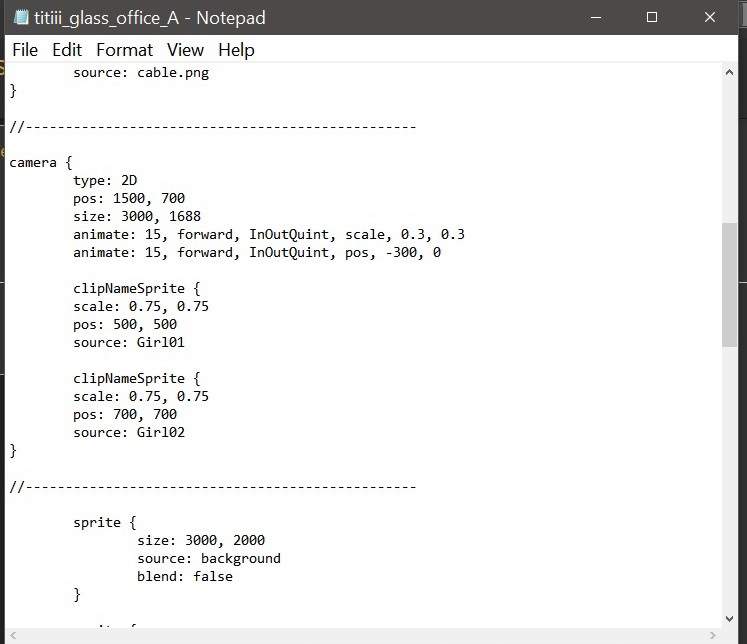
@JayZ971 - also the clipNameSprites, like all scene elements, should be inside the camera node - i.e. pkaced before what had been the closing "}" character if the .scn file not after it as you seem to have done.
TheEmu
Joined in Jul 2012 3309 post(s)
August 26, 2020 (edited)
@JayZ971 - for the X component of each clipNameSprite's pos: clause I would suggest that you use the same value that was used for the X component of the pos: clause in the corresponding clipSprite. This will vertically align each girl with her name.
Stanston
Joined in Aug 2018 1013 post(s)
August 26, 2020
@JayZ971
what would be the values for each girl ?Do it like myself, just Testing it out through changing these Values :)
August 26, 2020
@JayZ971 - also the clipNameSprites, like all scene elements, should be inside the camera node - i.e. pkaced before what had been the closing "}" character if the .scn file not after it as you seem to have done.
@JayZ971 - for the X component of each clipNameSprite's pos: clause I would suggest that you use the same value that was used for the X component of the pos: clause in the corresponding clipSprite. This will vertically align each girl with her name.
@TheEmu @Stanston
I did move the clipNameSprites to the camera section & adjusted the values.....this was the result. I'm going to try later, may even just delete the scene. Thank you again for all your help.
TheEmu
Joined in Jul 2012 3309 post(s)
August 26, 2020
@JayZ971 - you seem to have moved the clipNameSprites to the beginning of the camera node rather than to the end. Because of this they are behind everything else in the scene, including the background. Move them to just befre the final "}" in the .scn file. That character should be the closing brace corresponding to the opening "{" of the camera node.
For a simple scene
Camera { // start of camera node
.. camera parameters go here
.. various sprites for the various scene elements go here
clipnameSprite{ //start of clipnamesprite node
.. clipname sprite parameters
} // closes the clipnamesprite
} // closes the camera node - should be last thing in file
Typically you want the clipNameSprites to be in the foreground rather than be obscured by other scene elements, so they go last in the .scn file.
Carstrip
Joined in Apr 2020 219 post(s)
August 26, 2020
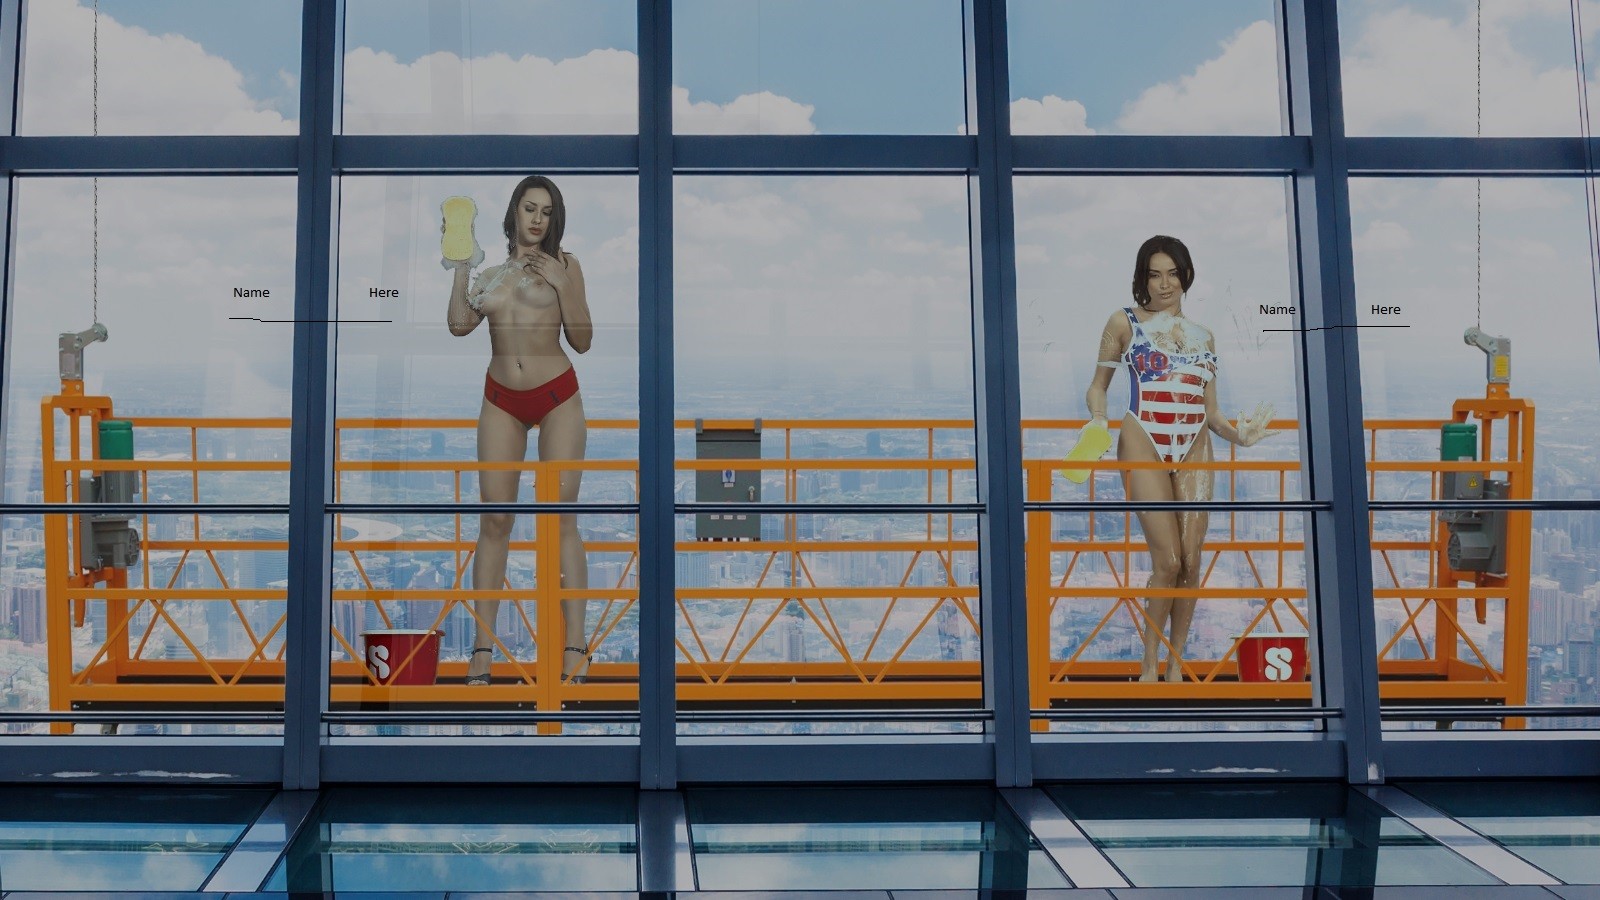
For whoever wants the name sprites on the 3 fullscreen scenes from @titiii glass scenes yesterday, I just added them, link to .scn files below 😉
https://drive.google.com/file/d/1DylOSkIJ-pOmImQK9VcGCgRYztdiZZH4/view?usp=sharing
https://drive.google.com/file/d/1DylOSkIJ-pOmImQK9VcGCgRYztdiZZH4/view?usp=sharing
TheEmu
Joined in Jul 2012 3309 post(s)
August 26, 2020 (edited)
@JayZ971 - After my previous post I also noticed that you have not properly closed the clipnamesprites. For every { at the start of any node there must be a } at its end. Unfortunately the system does not ***** when you make a mistake of this type, things just go wrong because the various nodes are not nested as they are intended to be.
More specifically you omitted the closing { for the first clipnamesprite, so everything else in the scene is nested inside it. This means, among other things, that any pos: clauses specify positions relative to that of that first clipnamesprite - hence the offsetting that you see in the final scene. And, as I said in my previous post. the clip names get hidden behind everything else in the scene because you have put the clipname sprites as the first elements in the scene.
More specifically you omitted the closing { for the first clipnamesprite, so everything else in the scene is nested inside it. This means, among other things, that any pos: clauses specify positions relative to that of that first clipnamesprite - hence the offsetting that you see in the final scene. And, as I said in my previous post. the clip names get hidden behind everything else in the scene because you have put the clipname sprites as the first elements in the scene.
x26638184
Joined in Oct 2018 189 post(s)
August 26, 2020
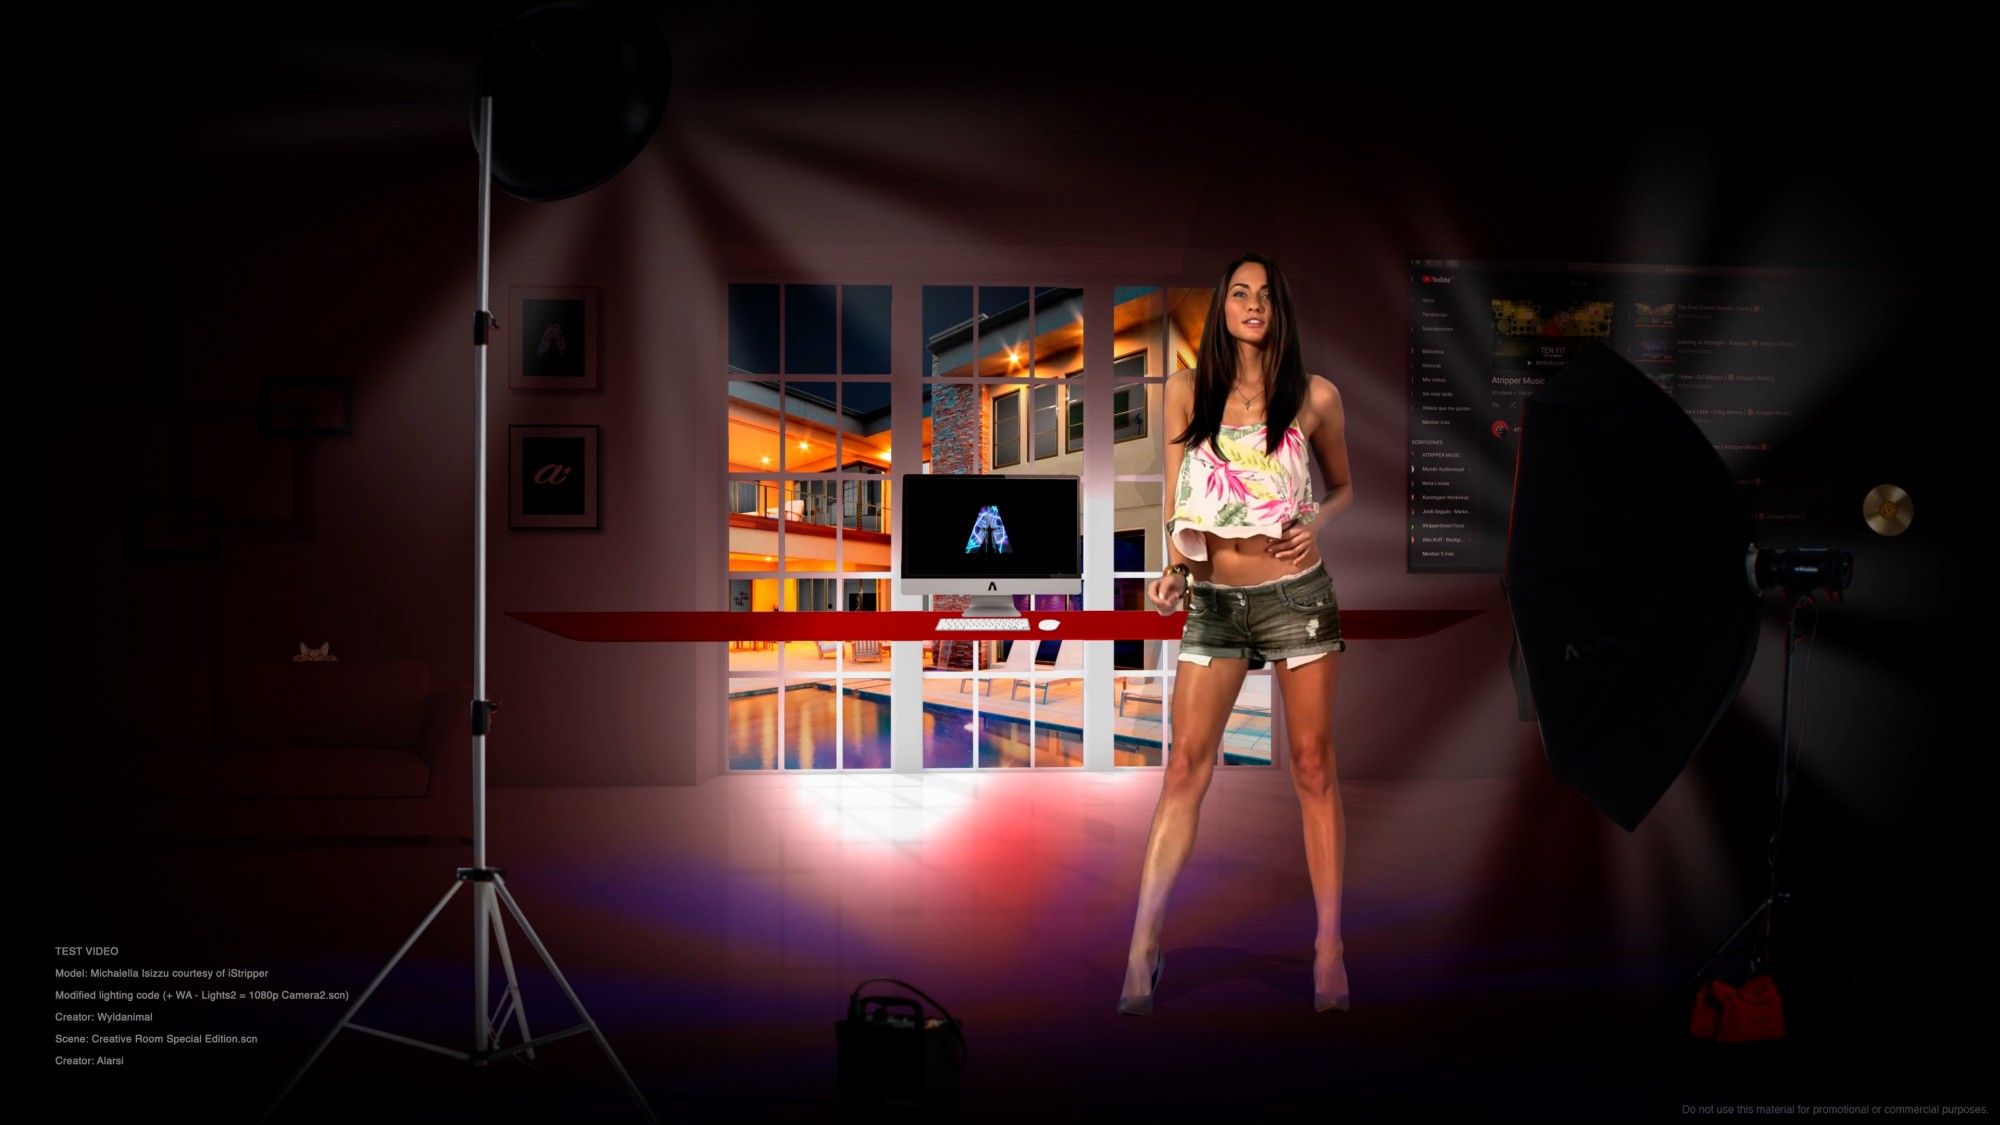
@Wyldanimal : Thanks! I'm going to 50% with this, now comes all the fine part of adjustments and several other things, but it looks beautiful. I am already understanding your code better (the scene with your lighting gets along very well, they are like soul mates ...
I attach a partial demo
Creative room special edition (Demo Video):
https://youtu.be/KdzdhWByPAU
August 27, 2020


With regard to clipname sprites you don't have to have them stationary. You can play about with them if you want to.
As per the attached screencaps you can make it rotate and change colour.
As per the attached screencaps you can make it rotate and change colour.
clipNameSprite {
scale: 1.5
pos: -350, 0, 1
rot: 0, 0, -45
hotspot: 0.5, 0.5
source: MyClip
color: 0, 0, 0
animate: 0.12, PingPong, inoutbounce, color, 1, 1, 1
animate: 0.24, PingPong, inoutbounce, color, 1, 1, 0
animate: 0.36, PingPong, inoutbounce, color, 1, 0, 0
animate: 0.48, PingPong, inoutbounce, color, 1, 0, 1
animate: 0.60, PingPong, inoutbounce, color, 0, 0, 1
animate: 0.72, PingPong, inoutbounce, color, 0, 1, 1
animate: 0.84, PingPong, inoutbounce, color, 0, 1, 0
animate: 2.5, PingPong, linear, rot, 0, 0, 360
}
TheEmu
Joined in Jul 2012 3309 post(s)
August 27, 2020 (edited)
To add to @Number6 's post you can also animate their size or equivalently their scale and position.
Or you can apply a shader to obtain any effect that you can think of - in which case this overrides their default behaviour of appearing only intermittantly. A "null" shader therfore makes them permanently visible so you can use them as part of the setting for a scene. The following is a null shader
Or you can apply a shader to obtain any effect that you can think of - in which case this overrides their default behaviour of appearing only intermittantly. A "null" shader therfore makes them permanently visible so you can use them as part of the setting for a scene. The following is a null shader
uniform vec2 u_WindowSize; // Window dimensions in pixels
// The image that is to be manipulated.
uniform sampler2D iChannel0;
vec2 Emu_Normalise_to_Window ( vec2 xy ) { return xy / u_WindowSize.xy; }
void main ( void )
{
// Get the normalised coordinates of the current point.
vec2 uv = Emu_Normalise_to_Window ( gl_FragCoord.xy );
// Update shader outputs.
gl_FragColor = texture2D(iChannel0,uv) * gl_Color;
}
x26638184
Joined in Oct 2018 189 post(s)
August 28, 2020
Someone who could make a native picture in picture in a scene?
sh42n81
Joined in Apr 2008 314 post(s)
August 28, 2020
Someone who could make a native picture in picture in a scene?
@7171al71 That should be farily easy to do. It gives me an idea about how to represent something that I have been struggling with.
x26638184
Joined in Oct 2018 189 post(s)
August 28, 2020 (edited)
@sh42n81: I've been watching your scenes, they are very good.
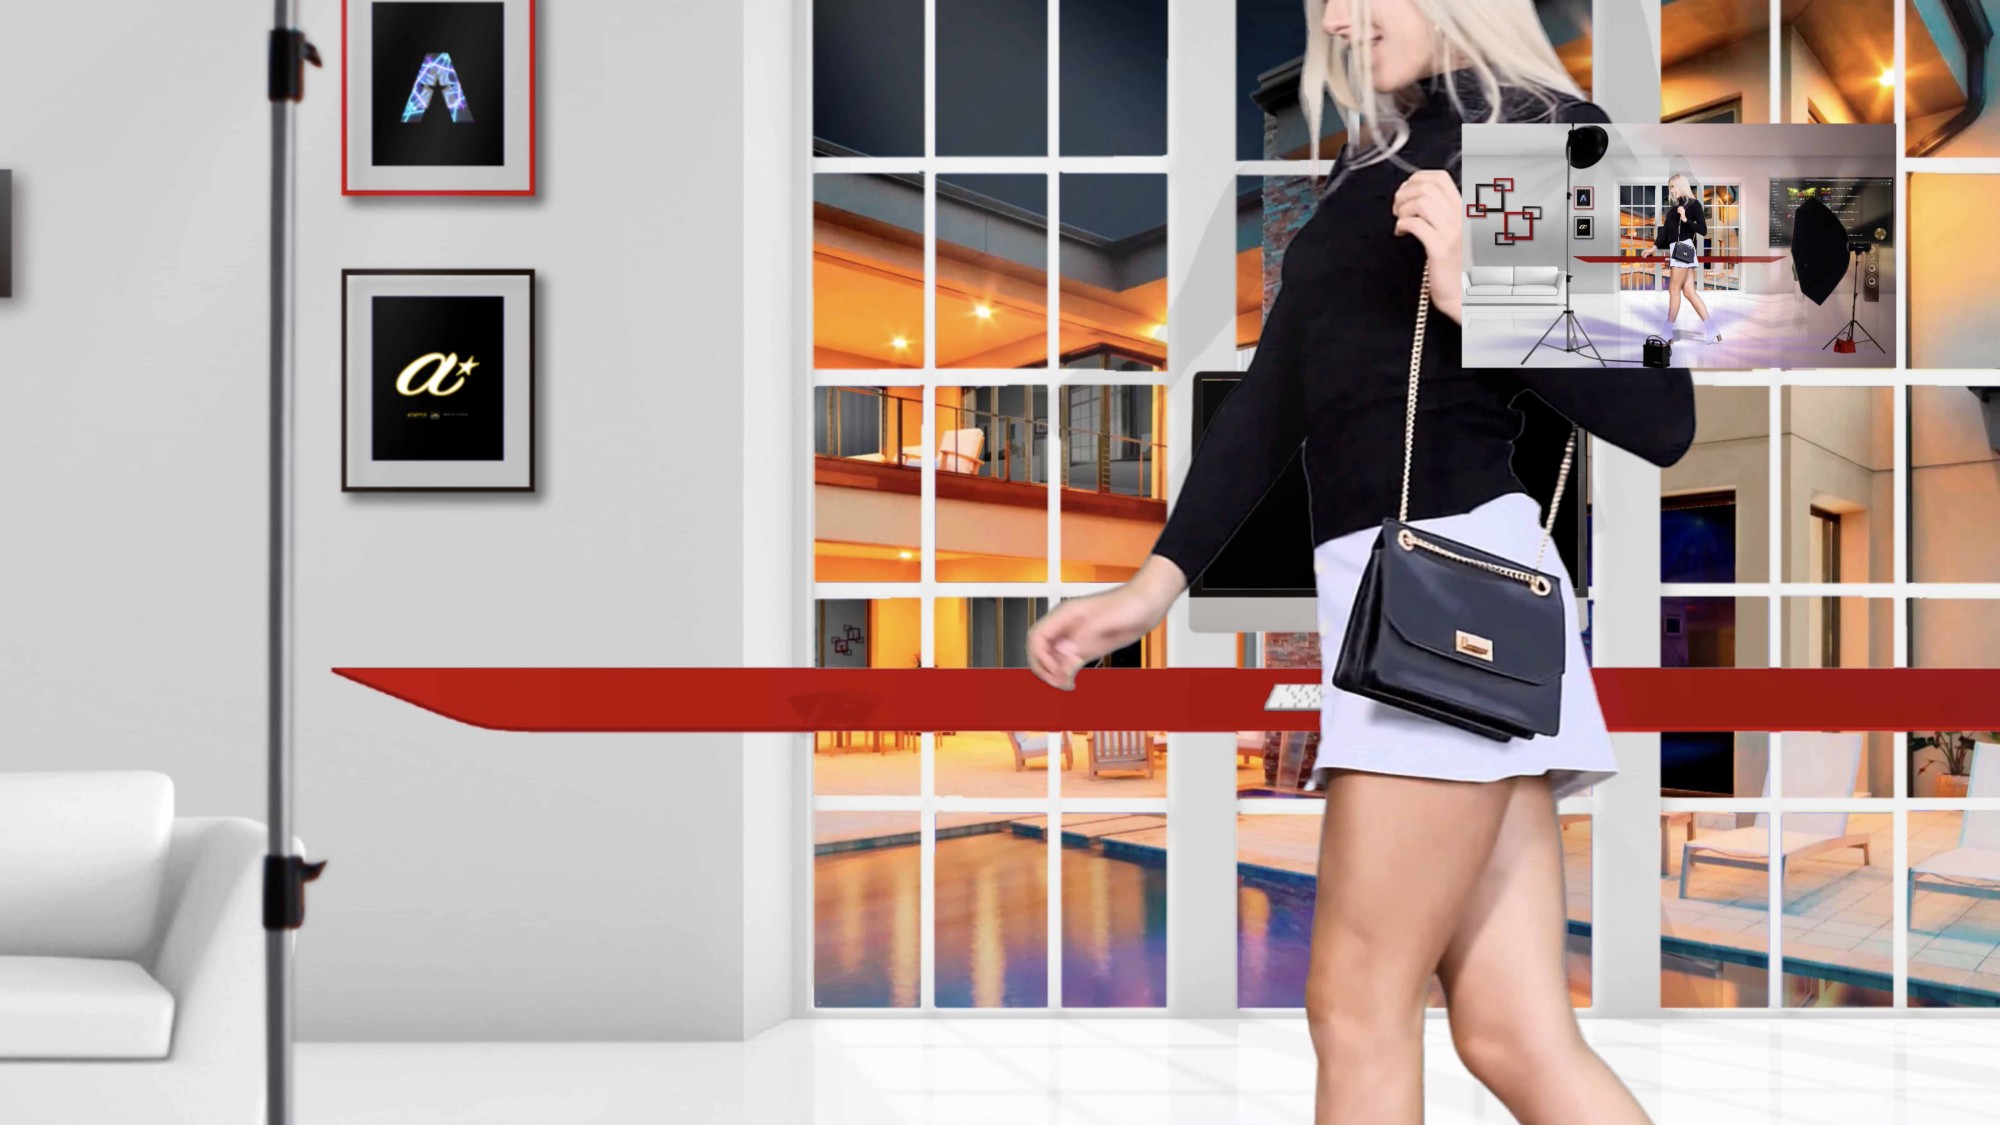
As for the PIP, I discovered how to do it, I was looking to do something else and I discovered it by accident. It looks great. !!!
Picture in Picture scene demo
https://youtu.be/RSxQv4k7JgA
As for the PIP, I discovered how to do it, I was looking to do something else and I discovered it by accident. It looks great. !!!
Picture in Picture scene demo
https://youtu.be/RSxQv4k7JgA
sh42n81
Joined in Apr 2008 314 post(s)
August 29, 2020
@7171al71 Thank you, that's kind of you. The P-in-P demo looks great!
sh42n81
Joined in Apr 2008 314 post(s)
August 29, 2020
@Wyldanimal; @TheEmu
Thank you for the lighting discussion. Once we start getting into triangles and vertices, I'm way out of my depth. Apart from a vague awareness that "triangles" are a thing in graphics for gaming, I don't have a foundation of knowledge here.
I have played with many of the "light" properties and have found that they have little apparent effect. Even testing the idea that a light must be placed behind a model and rotated 180 degrees if the model herself is rotated does not seem to hold true. The model in the scene that I'm working on is rotated but she lights up just fine if I place the light closer to the viewer than she is. If I position it deeper, but do not roatate it, she also lights without issue.
I was able to affect the intensity of the light by altering the z value of "pos:" and placing it farther away, and it *seemed* to have a ***** effect if I adjusted the y value. Adjusting the x value did not change the light property in any way that was perctible to me.
In the end, I acheived, to some extent, the effect that I was after by creating a mask of a dark, solid color, and then applying a gradient from transparent to that color.
sh42n81
Joined in Apr 2008 314 post(s)
August 29, 2020
@sh42n81 - there is at least one other oddity with the scene previews. If, as I often do, you use a single image with transparent sections, but with colour information retained for those transpaent sections, for both the background and foreground parts of the scene then those sections are displayed in white in the previews (or at least they are on my machine).
In case you are wondering, I use this so that I only need one image file rather than two and it automatically ensures that the background (which has blend: false) and the foreground (with blend: true) are perfectly aligned. Unfortunately, without resorting to shaders, this technique can not be extended to three or more layers in one image.
@TheEmu
I think I understand what you're saying here. Interesting tip.
TheEmu
Joined in Jul 2012 3309 post(s)
August 29, 2020 (edited)
@sh42n81
One ***** problem with using a single image with transparent portions for both background and foreground is that when using GIMP to do this and then resizing the image before exporting it would lose the colour information from the transparent area - at least with the version of GIMP that was current 18 months ago I have not checked the latest version. This doesn't invalidate the technique but it does mean that you have to be careful when creating the transparent sections - if you do need to resize after creating the "holes" then use the Colors/Curves tool to temporarily make them visible again and and after resizing set them back to transparent (unless, of course, there is no longer a problem with the current version in which case you don't need to bother). Fortunately GIMP has an almost unlimited undo capability which has been of immense use to me with this and other mistakes that I have made editing an image.
One ***** problem with using a single image with transparent portions for both background and foreground is that when using GIMP to do this and then resizing the image before exporting it would lose the colour information from the transparent area - at least with the version of GIMP that was current 18 months ago I have not checked the latest version. This doesn't invalidate the technique but it does mean that you have to be careful when creating the transparent sections - if you do need to resize after creating the "holes" then use the Colors/Curves tool to temporarily make them visible again and and after resizing set them back to transparent (unless, of course, there is no longer a problem with the current version in which case you don't need to bother). Fortunately GIMP has an almost unlimited undo capability which has been of immense use to me with this and other mistakes that I have made editing an image.
TheEmu
Joined in Jul 2012 3309 post(s)
August 30, 2020
@ComteDracula - this is in response to your question in the Scene Sharing thread
clipSprite {
pos: -600, 195 // Change this to be pos: -800, 195
standingHeight: 525
source: ClipB
scale: 1, -0.25, 1
opacity: 0.5
color: 0.0, 0.0, 0.0
material: true
}
clipSprite {
pos: -800, 200 // If this is where you want the girl then you want the shadow to be close to it
standingHeight: 525
scale: 1, 1, 1
source: Clip
material: true
}
With regard to the direction of the girls shadows and those in the background or foreground elements of the scene, You can use a small rotation to change its direction slightly but if you rotate by more than a few degrees the shadow will detach itself from the dancer's feet. There is little that can be done about that without using a more complex shader to generate the shadow - you need to distort the clip containing the shadow from a rectangle to a parallelogram by applying a shear transform or even better by applying a combination of a shear and an taper. This can be combined with the blurring that is already being used for the shadow and even with a gradient applied to the colour and opacity of the shadow. But though this is relatively simple shader work it is by no means trivial. I have such a shader but it is a real ***** to use. Someday I may try to make it more user friendly, but until then i do not recommend that you try to use it unless you are really comfortable with using or writing shaders.
With regard to the direction of writing on the girls clothes, you could reverse the whole scene then the girls could enter from side and still have the writing the right way round.
clipSprite {
pos: -600, 195 // Change this to be pos: -800, 195
standingHeight: 525
source: ClipB
scale: 1, -0.25, 1
opacity: 0.5
color: 0.0, 0.0, 0.0
material: true
}
clipSprite {
pos: -800, 200 // If this is where you want the girl then you want the shadow to be close to it
standingHeight: 525
scale: 1, 1, 1
source: Clip
material: true
}
With regard to the direction of the girls shadows and those in the background or foreground elements of the scene, You can use a small rotation to change its direction slightly but if you rotate by more than a few degrees the shadow will detach itself from the dancer's feet. There is little that can be done about that without using a more complex shader to generate the shadow - you need to distort the clip containing the shadow from a rectangle to a parallelogram by applying a shear transform or even better by applying a combination of a shear and an taper. This can be combined with the blurring that is already being used for the shadow and even with a gradient applied to the colour and opacity of the shadow. But though this is relatively simple shader work it is by no means trivial. I have such a shader but it is a real ***** to use. Someday I may try to make it more user friendly, but until then i do not recommend that you try to use it unless you are really comfortable with using or writing shaders.
With regard to the direction of writing on the girls clothes, you could reverse the whole scene then the girls could enter from side and still have the writing the right way round.
sh42n81
Joined in Apr 2008 314 post(s)
August 31, 2020 (edited)
The difficulties arise because you are moving the camera in and out relative to the both th performers and the other screen elements, consequently those that have been placed closer to the camera are more affected than those further away which can often result in unrealistic apparent changes in the relative sizes of the objects in the scene.
In principle this problem can be overcome by properly placing the various objects in the scene at their proper positions in 3D space
@TheEmu
I finally had a chance to tuck into this and gain an understanding. I have gotten around to figuring out the sequential panning and zooming that I wanted to do with "Ruination 1" and was chagrined to discover that "animate: angle" doesn't seem to work inside a nested node. At least, I couldn't get anywhere with it. So, it was back to animating the camera's position again, and back to the clipSprites sliding all over the place.
So I have thought about your comment above. I gotta admit: I have been thinking in mostly 2D terms all this time. The only reason I use a 3D camera is because the first scene that I used as a template had one, and that's what I have been using ever since.
I actually and intentionally have ignored the z value for the clip positioning, having tried it and having observed that it seemed to only change the scale and vertical position of a clip on my 2D screen the same way that I can do by adjusting the y value and the size or scale values. I have a pretty good sense of what the size and y values need to be when I place a clip, based on the camera size and position that I always use, so I can quickly drop a clip very close to where I want it, and then only some fine tuning is needed. Modifying the z value throws all those values off (of what I'm accustomed to), so I haven't bothered.
But now I see. At the least, it matters when changing the camera position, and placing a clip at the same z value and the camera definitely makes the operation smoother. Thanks again for you insight. It must be amusing to you to watch me attempting to make scenes without a whisp of a clue what I'm doing. You are very kind to withhold deserved ridicule.
TheEmu
Joined in Jul 2012 3309 post(s)
August 31, 2020 (edited)
@sh42n81
The only type of node that has an Angle property is the Camera node, so that is the only place you can animate it. The same is true for the Target property. Furthermore these only make sense for the 3D camera type.
All nodes, including the simple Node{} node and the Camera node, have Pos, Rot, and Scale properties that you can animate. Setting any of these properties for a node of any type, including any animations you may apply to them, will affect any nodes, of any type, nested inside it. There are limitations on what you can do if you are using a 2D camera.
Sprite nodes, including clipSprite and clipNameSprite, and Quad nodes also have Color and Opacity properties that can be animated. Setting these properties will not affect nested nodes.
The reason why the Z value matters when you are using a 3D camera is because if you are using such a camera then the various things (i.e. Sprites of all kinds) in the scene are placed in a 3D space rather than on a flat plane so their apparent size depends on ther distance from the camera. If you move them closer to the camera (either by moving them or the camera) then they appear to get bigger and get smaller if you move them away from the camera.
If then follows that if you move the camera towards the scene, by animating the Z component of its position, things will appear to grow at different rates if they are at different distances, in particular if they have different Z components for their position. However, if instead of moving the camera you animate the camera's Angle (i.e. its angular width of view) then this zooming will affect all of the items in its field of view by the same amount no matter how far away they are from the camera. As I said in a previous reply moving the camera in and out is "Tracking", changing the Angle is true Zooming as you would get in real life with a zoom lens.
Similarly if you move the camera sideways or up and down then the apparent speed at which items in the scene move will also depend on how far away they are from the camera. This can sometimes be used to good effect o enhance the 3D feeling of a scene (but it can also make the girls look as if they are sliding on the floor if they are not at the same distance from the camera as the image of the floor which is normally part of the background image. You can eliminate this sliding effect by having a separate images for the floor, the background and and walls in the scene but it gets complicated.
You can use the Z position of a clipSprite to ensure that if the sprite is moved it will automatically adjust its apparent size to match where it is positioned against the background - but for that to work you have first to have matched the camera's position, its target position and field of view (i.e. its Angle) to match the perspective of the image used for the background which is not an easy task. I have done that, for example, in the Dodgems scene and I do not recommend doing it unless you really really need to do it to make the scene work.
One ***** thing you may notice in 3D scenes is that the girls, or rather their sprites, towards the edges of the scene are not directly facing the camera. This is because the front face of a sprite, by default, is perpendicular to the Z axis (i,e, the sprite i in the X-Y plane parallel to the screen) so a straight line from the camera to the centre of the sprite will be at an angle to the surface of that sprite. Normally the effect is not noticeable but In very rare cases (e.g. if you are using a very wide angle camera or have moved the camera a long way from the centre of the scene) you may want to correct for this effect by slightly rotating the sprites to directly face the camera (if necessary animating the rotations to match changes in the camera position). An extreme example of this would be if you set a scene in a room and slowly rotate the camera about the vertical, Y, axis by 360 degrees to see all four walls of the room and the girls in those directions - by the time you had rotated by 90 degrees you would be seeing the girls edge-on unless you had applied a compensatory rotation to their clipSprites. You can also see the induced apparent rotation if you change the camera's target differently to its position - which is why I normally animate both pos: and target: if I move the camera other than directly towards or away from the target. This target dependacy can be reduced by placing the target position a long way behind everything, i.e. by giving it a large absolute value for Z, but moving it with the camera eliminates it completely as that keeps the target direction costant.
You probably do not need to use much of the above in simple scenes, but even for such things it helps to understand what is going on - and to do that the simplest thing to do is think of a scene as a collection of flat items positioned in 3D space being viewed from the camera which is looking at a particular point in that space ...
TheEmu
Joined in Jul 2012 3309 post(s)
August 31, 2020 (edited)
My previous post grew so large after a series of edits adding details that it got truncated, Here is the final paragraph in full:
You probably do not need to use much of the above in simple scenes, but even for such things it helps to understand what is going on - and to do that the simplest thing to do is to think of a scene as a collection of flat items positioned in 3D space being viewed from the camera which is looking at a particular point in that space (its target position). it's a bit like having an old fashioned toy theatre with various scenic backdrops, props and characters all on flat cut out pieces of thin cardboard. For 2D scenes an equivalent analogy would be building up a scene from layers of drawings on transparent film as was done for classic cartoons before it all became computerised.
You probably do not need to use much of the above in simple scenes, but even for such things it helps to understand what is going on - and to do that the simplest thing to do is to think of a scene as a collection of flat items positioned in 3D space being viewed from the camera which is looking at a particular point in that space (its target position). it's a bit like having an old fashioned toy theatre with various scenic backdrops, props and characters all on flat cut out pieces of thin cardboard. For 2D scenes an equivalent analogy would be building up a scene from layers of drawings on transparent film as was done for classic cartoons before it all became computerised.
You are not allowed to participate yet
As a free user of iStripper, you are not allowed to answer a topic in the forum or to create a new topic.
But you can still access basics categories and get in touch with our community !